Create
게시판 목록까지 만들어 보았고 다음은 게시글을 작성하는 페이지를 만들어 보자.

게시글을 쓰기 위해 해당 버튼을 누르면 글 쓰는 페이지로 가게 해줘야 한다.
위 게시글 목록을 출력하는 list.html에서 글쓰기 버튼을 누르면 /post 에 해당되는 url로 가도록 설정했다.
이를 위해 먼저 post.html을 만들고 Controller를 통해 /post 의 url로 가면 post.html 파일을 보여주도록 해보자
<post.html>
<!DOCTYPE html>
<html lang="ko" xmlns:th="http://www.thymeleaf.org">
<head>
    <meta charset="UTF-8" />
    <title>게시판 - 글쓰기</title>
    <link rel="stylesheet" href="/webjars/bootstrap/4.5.0/css/bootstrap.min.css" />
</head>
<body>
<header th:insert="common/header.html"></header>
<div class="container">
    <form action="/post" method="post">
        <div class="form-group row">
            <label for="inputTitle" class="col-sm-2 col-form-label"><strong>제목</strong></label>
            <div class="col-sm-10">
                <input type="text" name="title" class="form-control" id="inputTitle" />
            </div>
        </div>
        <div class="form-group row">
            <label for="inputAuthor" class="col-sm-2 col-form-label"><strong>작성자</strong></label>
            <div class="col-sm-10">
                <input type="text" name="author" class="form-control" id="inputAuthor" />
            </div>
        </div>
        <div class="form-group row">
            <label for="inputContent" class="col-sm-2 col-form-label"><strong>내용</strong></label>
            <div class="col-sm-10">
                <textarea type="text" name="content" class="form-control" id="inputContent"></textarea>
            </div>
        </div>
        <div class="row">
            <div class="col-auto mr-auto"></div>
            <div class="col-auto">
                <input class="btn btn-primary" type="submit" role="button" value="글쓰기" />
            </div>
        </div>
    </form>
</div>
<script src="/webjars/jquery/3.5.1/jquery.min.js"></script>
<script src="/webjars/bootstrap/4.5.0/js/bootstrap.min.js"></script>
</body>
</html>
html 코드는 일단 복붙하자
그리고 Controller를 개발해보면 다음과 같다.
이제 스프링 메인 메서드를 다시 실행해서 글쓰기 버튼을 누르면 다음과 같이 게시글 작성하는 페이지가 나오는 것을 확인할 수 있다.
이제 게시글을 작성해서 글쓰기 버튼을 눌렀을 때 작성한 것들을 DB에 저장하고 이를 통해 게시글 목록에 쓴 게시글을 출력하도록 해보자
post.html을 보면 글을 작성하고 글쓰기 버튼을 누르면 html의 form 태그를 통해 /post 의 url에 POST방식으로 작성한 게시글 객체를 보내주게 된다. 그럼 이 객체를 받아 DB에 저장하는 응답을 컨트롤러를 통해 구현해 보자.
@PostMapping을 통해 /post url에 POST방식으로 넘어온 데이터를 받을 수 있다.
여기서는 작성한 게시글 객체가 넘어오게 되고 서비스 객체를 통해 리포지토리 객체로 게시글을 넘겨주고 리포지토리 객체가 DB에 게시글을 저장해주게 된다. 그러고는 게시글 목록 화면이 뜨도록 해줬다.
이제 게시글을 작성해서 글쓰기 버튼을 눌러보면 잘 저장되어서 게시글 목록 화면에 출력되는 것을 볼 수 있다.
Detail
다음으로 게시글을 수정하고 삭제하기 위해서 각 게시글에 들어갈 수 있는 상세 페이지를 만들면 좋을 것 같다.
이를 위해 list.html에서 제목 부분에 있는 하이퍼레퍼런스를 이용할 것이다.
이를 통해 해당 게시글의 제목을 누르면 /post/게시글의 id 인 url로 가게 된다. 그럼 이제 또 컨트롤러를 통해 해당 url로 갔을 때의 응답을 구현해주면 된다.
컨트롤러로 넘어온 게시글의 id 값을 통해 해당 id 값의 게시글 객체를 DB에서 찾아온 후 상세 페이지인 detail.html로 모델을 통해 넘겨주는 로직으로 구현해보자.
여기서 id 값을 받기 위해 @PathVariable을 사용한다.
기능만 살펴보면 /post/{id} url에서 경로 변수인 id 값을 매개 변수 id로 전달해 준다. 이를 통해 DB에서 해당 id인 게시글 객체를 찾을 수 있다. 찾은 객체를 post라는 이름으로 모델을 통해 detail.html에 넘겨주게 된다.
<detail.html>
<!DOCTYPE html>
<html lang="ko" xmlns:th="http://www.thymeleaf.org">
<head>
    <meta charset="UTF-8" />
    <title th:text="@{'게시판 - ' + ${post.title}}"></title>
    <link rel="stylesheet" href="/webjars/bootstrap/4.5.0/css/bootstrap.min.css" />
</head>
<body>
<header th:insert="common/header.html"></header>
<div class="container">
    <div class="card">
        <div class="card-body">
            <h5 class="card-title" th:text="@{${post.title} + ' - ' + ${post.author}}"></h5>
            <p class="card-text" th:text="${post.content}"></p>
        </div>
    </div>
    <div class="row mt-3">
        <div class="col-auto mr-auto"></div>
        <div class="col-auto">
            <a class="btn btn-info" th:href="@{'/post/edit/' + ${post.id}}" role="button">수정</a>
        </div>
        <div class="col-auto">
            <form id="delete-form" th:action="@{'/post/' + ${post.id}}" method="post">
                <input type="hidden" name="_method" value="delete" />
                <button id="delete-btn" type="submit" class="btn btn-danger">삭제</button>
            </form>
        </div>
    </div>
</div>
<script src="/webjars/jquery/3.5.1/jquery.min.js"></script>
<script src="/webjars/bootstrap/4.5.0/js/bootstrap.min.js"></script>
</body>
</html>
다음과 같이 제목을 누르면 상세 페이지가 나오는 것을 확인할 수 있다.

Update
detail.html에서 수정 버튼을 누르면 다음 url 주소로 가게 된다.

수정하는 페이지는 작성하는 페이지와 형식은 똑같으나 작성하는 칸에 수정할 게시글이 들어있으면 좋겠다.
그러려면 id를 통해 게시글 객체를 찾아 아래와 같이 html의 input 태그에 value 값으로 게시글 정보를 넣어주면 된다.
<edit.html>
<!DOCTYPE html>
<html lang="ko" xmlns:th="http://www.thymeleaf.org">
<head>
    <meta charset="UTF-8" />
    <title>게시판 - 글 수정</title>
    <link rel="stylesheet" href="/webjars/bootstrap/4.5.0/css/bootstrap.min.css" />
</head>
<body>
<header th:insert="common/header.html"></header>
<div class="container">
    <form th:action="@{'/post/edit/' + ${post.id}}" method="post">
        <input type="hidden" name="_method" value="put" />
        <input type="hidden" name="id" th:value="${post.id}" />
        <div class="form-group row">
            <label for="inputTitle" class="col-sm-2 col-form-label"><strong>제목</strong></label>
            <div class="col-sm-10">
                <input
                        type="text"
                        name="title"
                        class="form-control"
                        id="inputTitle"
                        th:value="${post.title}"
                />
            </div>
        </div>
        <div class="form-group row">
            <label for="inputAuthor" class="col-sm-2 col-form-label"><strong>작성자</strong></label>
            <div class="col-sm-10">
                <input
                        type="text"
                        name="author"
                        class="form-control"
                        id="inputAuthor"
                        th:value="${post.author}"
                />
            </div>
        </div>
        <div class="form-group row">
            <label for="inputContent" class="col-sm-2 col-form-label"><strong>내용</strong></label>
            <div class="col-sm-10">
            <textarea
                    type="text"
                    name="content"
                    class="form-control"
                    id="inputContent"
                    th:value="${post.content}"
            ></textarea>
            </div>
        </div>
        <div class="row">
            <div class="col-auto mr-auto"></div>
            <div class="col-auto">
                <input class="btn btn-primary" type="submit" role="button" value="수정" />
            </div>
        </div>
    </form>
</div>
<script src="/webjars/jquery/3.5.1/jquery.min.js"></script>
<script src="/webjars/bootstrap/4.5.0/js/bootstrap.min.js"></script>
</body>
</html>
@GetMapping을 통해 위에서 수정 버튼을 눌렀을 때 가는 url을 받아 처리하는 메서드를 만들어 보자.

로직은 상세 페이지와 같다. id를 받아와 DB에서 같은 id값을 가지는 게시글 객체를 가져와 모델로 edit.html에 뿌려준다.
제목과 작성자는 잘 가져오는데 내용은 못 가져오네?

이제 게시글을 수정해서 수정 버튼을 눌러보자
edit.html에서 form 태그를 보면 수정 버튼을 누르면 action값의 url에 POST 방식으로 보내는 것을 볼 수 있다.
근데 form태그 안에 있는 input태그를 보면 hidden type으로 put 방식으로 되어 있는 것을 볼 수 있다.

그럼 컨트롤러에서는 전송된 form을 @PostMapping으로 받을까 아니면 @PutMapping으로 받을까?
일단 기본적으로 form에서는 put, delete 와 같은 메서드들을 지원하지 않는다..!
따라서 HiddenHttpMethodFilter를 사용해 form에서 지원하는 기존 메서드로 전송하고 서버에서는 원하는 메서드로 받을 수가 있다. 즉, form을 POST 방식으로 전송하고 컨트롤러에서는 PUT 방식으로 변환하여 받는 것이다.
그래서 HiddenHttpMethodFilter를 사용하기 위해 SpringConfig파일에 다음과 같이 Bean등록을 해주자.


그러면 위 코드가 의미하는 것은 form 형식을 action 값에 있는 url에 POST 방식으로 전송하고 서버에서는 이를 변환해 PUT 방식으로 받게 된다.
결론적으로 컨트롤러(서버)에서는 전송된 form을 받기위해 @PutMapping을 사용해야 한다.

다음과 같이 수정하고 홈 화면으로 가도록 메서드를 구현해 봤다.

잘 수정되는 것을 볼 수 있다!
Delete
게시글을 삭제하기 위해 삭제하는 버튼이 있는 form형식을 보면 다음과 같다.

수정할때와 비슷하게 form 형식을 기존 POST 방식으로 전송하고 서버에서는 이를 변환해 DELETE 방식으로 받는 것을 알 수있다.
이를 위한 컨트롤러 메서드를 구현해 보자.
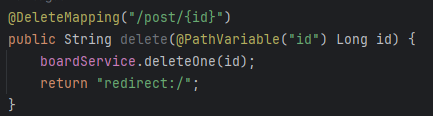
기능을 확인해보면 다음과 같이 잘 삭제되는 것을 볼 수 있다

지금까지 spring boot와 H2 데이터베이스를 사용해 CRUD 기능을 가진 간단한 게시판을 구현해보았다.
이렇게 간단한 게시판도 쉽지만은 않았다..ㅎ
서버를 만들기 위해 백엔드쪽 기술만 알면 될 줄 알았는데 프론트쪽 코드를 알아야 이를 통해 응답을 줄 수있는 서버를 만들 수 있겠구나도 깨달았다.
'Spring > spring boot' 카테고리의 다른 글
| spring boot를 사용한 게시판 만들기(3): 게시판 목록 출력 (1) | 2024.04.06 |
|---|---|
| spring boot를 사용한 게시판 만들기(2): 백엔드 개발 (0) | 2024.04.04 |
| spring boot를 사용한 게시판 만들기(1): 서비스 구조, 개발 환경 구축 (0) | 2024.03.30 |


